
Business Analysis Planning Techniques
Three Project Planning Techniques that is useful for Business Analysts to apply
There are a few reasons why it is really good for a Business Analyst to have some familiarity and practical skills when it comes to some basic (but powerful) Project Planning Techniques. Apart from the fact that most Business Analysts operate within a project environment and therefore should really understand the main planning activities and cycles that is happening around them it can also be extremely useful for a Business Analyst to be able to properly plan for their own Business Analysis activities on a project using these Business Analysis Planning techniques.
It is also very useful knowledge for a Business Analyst simply from the perspective of adding even more value as a Business Analyst within a project environment.
 There are a few specific Project Planning techniques that a Business Analyst should learn and a few concepts to understand to really perform optimally within the project environment. These techniques and concepts are very applicable when it comes to Business Analysis planning and estimation activities. On smaller projects where the Business Analyst gets more involved with working closely with a Project Manager (or even play the role of a pseudo Project Manager) these techniques are like your bread and butter when it comes to planning tasks.
So let’s now have a look at the three core Business Analysis Planning Techniques (borrowed from the Project Management Profession) that will help you in your role as a great Business Analyst.
These three Business Analysis Planning Techniques are distinct techniques but they all work together to build up a comprehensive Project Plan which turns into the Project’s detailed schedule. The steps to build this overall Project Plan / Project Schedule is as follows:
Step 1: Build a Work Breakdown Structure (WBS)
Step 2: Create a Network Diagram (using your WBS)
Step 3: Create a Gantt Chart (using the Network Diagram)
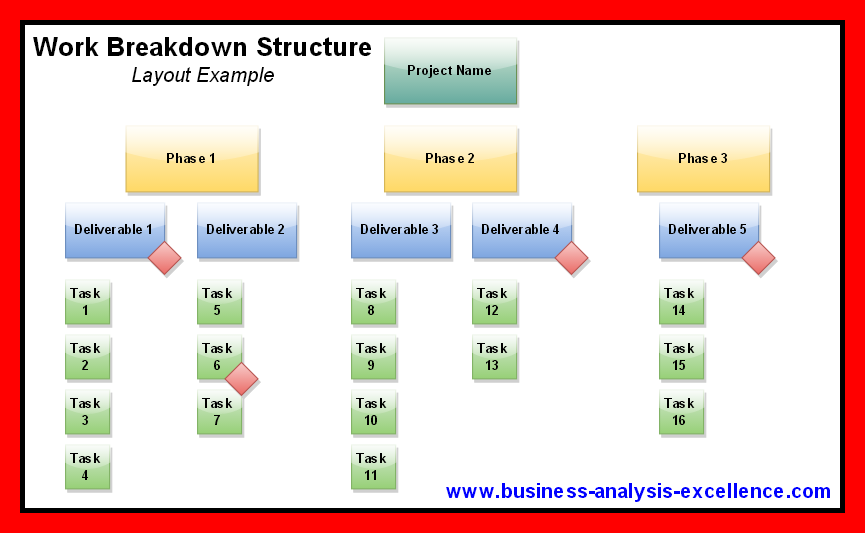
Business Analysis Planning Technique #1: Work Breakdown Structure (Step 1 in Building a Project Plan)
The Work Breakdown Structure is a Project Planning technique used to plan out everything that needs to be delivered by the project in terms of Phases, Deliverables and Tasks. It deliberately doesn’t take the timeframe, the sequencing or any dependencies into account yet and should be seen as the very first step of Building a Project Plan / Schedule.
Let’s first define the specific terms you need to understand when learning about the Work Breakdown Structure:
Phase: The Phase of a project is a logical grouping of activities and deliverables that is grouped together for purposes of planning for a project. The Phases often aligns with the phases used in the Systems Development Life Cycle although this will be different when you plan for an Agile based Project.
Deliverable: A deliverable is a specific output that the project must deliver along the way of being executed. Examples of deliverables could be documents, software packages or any tangible result that makes the project progress to the next stage of the plan.
Tasks: A task in the context of project planning refers to a set of steps or activities that is typically performed to work towards achieving a deliverable. Therefore there will be a set of different tasks that needs to be completed before a deliverable can be achieved. In most cases it takes more than just one task to deliver an outcome. When you define your tasks you should break down small enough to assign to one person or one group with specific skills to execute. A task will be typically something that requires between 1 and 5 days worth of work effort.
So now that you understand the concepts you need for starting to build your Work Breakdown Structure. You should also take note that there is another approach to determining all the required work for a project by using a Product Breakdown Structure. This method is similar to the Work Breakdown Structure and achieves the same overall outcome but is underpinned with another methodology called Prince II. We will not be covering that method here but once you understand the Work Breakdown Structure Technique, you will be in a great position to understand the Product Break Down Structure too.
How to build your Work Breakdown Structure?
Ideally you should get yourself a big white board or a large table to work on. Get yourself some large and medium sized “Post It” notes and some different coloured marker pens. You are going to be sticking things on the wall and scribbling on them as you go, so make sure you are prepared. The reason using “Post It” notes are recommended is because you are going to be moving the “Post It” notes around and will be using them again when you start Step 2: Creating the Network Diagram.
 Give your Project a Name: Take a large “Post It” note and write the Project Name on it. You then put that note at the very top (in the middle) of the white board or table as if it was the position of the CEO on an organisational chart.
Define your Phases: The second step you will do is to define which phases you believe will be involved with your project. For example, if you are planning a software development project you may want to have phases such as: Initiation Phase, Analysis Phase, Design Phase, Build Phase, Test Phase and Implementation Phase.
You should take the large “Post It” notes and write a Phase Name on each of them. You will then stick them at the top of your white board from left to right (leave as much space in between each Phase “Post It” note as you can.
Define your Deliverables: Now that you have your Project Name and Phases defined and up on the white board or the table, you can start thinking about what key deliverables each phase will be delivering. For example: Your Analysis Phase will probably be delivering the following two deliverables (as a minimum): Business Requirements Document and Business Analysis Approach Document. These are just two examples but you can image the type of deliverables that you need to think of here.
You should again take the large “Post It” notes and write the name of the Deliverable on the note. You then stick these “Deliverable”s under each Phase (where they will be
completed) as if they are the Phase’s sub-ordinates on an organisational chart.
Define your tasks: Each Deliverable will have to be delivered as a result of a range of different tasks that was performed by the project team. This is now where you take each Deliverable and break down exactly what tasks must be completed in order to deliver that deliverable. Examples of some tasks required for the delivery of the Business Requirements Deliverable could be: Perform a Requirements Gathering Workshop, Document Business Requirements, Review Business Requirements.
You now take the small “Post It” notes and write each task on the note and stick the tasks underneath the corresponding Deliverable on your white board or table. Once you have done all the tasks for each deliverable you will have the framework for your WBS all set up and ready for estimation.
Estimation
Now that you have all the Phases, Deliverables and Tasks outlined on the White board or table you are ready to evaluate each task in terms of how much effort is involved to complete this task. It is typically suggested that you write the minimum number of days (or hours for a smaller project) in one corner of the small “Post It” note and the maximum number of days (or hours) in another corner of the “Post It” note. You only do this for the Tasks because the tasks are the only things on your WBS which requires effort to complete.
So now go through each Task with your team and agree on the minimum and maximum values for each Task.
Milestones
As a final step before you complete the Work Breakdown Structure is to identify the Deliverables and Tasks which you see as Milestones. A milestone in the context of Project Management is when you feel like you have reached a critical point or achieved a significant result in the project.
With your team you should review all the Deliverables and Tasks and decide which ones are deemed “milestones” for your project as it progresses. For those milestones you should draw a diamond symbol on the “Post It” note to illustrate that the particular item is a milestone for the project.
Now you can stand back and admire the WBS. It is a great idea to mark each Deliverable and Task in a way which will remind you which Task belongs to which Deliverable and which Deliverable is part of which phase. This is important especially for the next step where you will start the build the Network Diagram.
Business Analysis Planning Technique #2: Network Diagram (Step 2 in Building a Project Plan)
The purpose of the Network Diagram is to ultimately determine the critical path of the project. The Network Diagram shows the sequence and dependencies that project tasks have upon each other.
How to build your Network Diagram:
You do this by taking all the ‘Post It’ notes which are the Tasks (put the Deliverables & Phases aside) of your project. Start to take them one by one and by starting on the left of the white board, you place it in the sequence of execution. Part of the objective here is to figure out which tasks can run in parallel and what dependencies exist between tasks.
Example: Let’s say your Project is to make coffee. Pretend you have unlimited people helping you do this project.
Task 1: Put the kettle on
Task 2: Find a cup,
Task 3: Drink the coffee.
You would place Task 1: Put kettle on and Task 2: Find a cup in the same invisible column on the white board on the left (working from left to right).
Then you will place Task 3 (drink the coffee) in the next invisible column along.
Task 1 & 2 are not dependent on each other because they can be executed at the same time and there were enough people helping to make the coffee and therefore you place one below the other in the first invisible column.
Task 3 is dependent on both Task 1 and Task 2 to be executed before you can start executing Task 3. This is why you place Task 3 in the next invisible column.
You should now try and do this with all the Tasks in your real project.
 Critical Path
Once you have all your Project tasks outlined in the way described you have achieved two key project planning results. You know what sequence you need to execute the tasks in and you also know which tasks is dependant on other tasks. You now have to determine what the duration of the project is by working out what is the longest time-frame the project needs to execute all the tasks. Keep in mind that the number of people who you would have available to execute your project has not been determined yet. It is now just about understanding based on the sequence and dependencies what is the quickest and the slowest duration of the project.
How to determine the critical path?
When you determine the critical path you need to identify each task in each invisible column on the Network Diagram with the maximum duration assigned to it. Remember how you placed a minimum and maximum duration on each task? Now is the time to use this maximum number. So for each task that you identify in each invisible column with the highest maximum value, you should make a circle around the maximum duration for that task (preferably in a new colour). Once you have determined the highest maximum task for task in the invisible column and you marked them out you should add the maximum durations for all these tasks together. Once you come up with a total duration you will know that maximum length of time the project should take. These tasks you identified forms what is referred to as the critical path of your project. If any of the tasks on the critical path is taking longer to finish than the maximum duration that was planned for, your project is effectively running over the critical path and is therefore running late. This is why project managers are often very focussed on doing whatever they can to stay within the critical path of the projects!
Finally, you can a similar exercise to determine the quickest that project can be completed by identifying, marking and adding up the highest minimum duration values for each invisible column on your Network Diagram. This is another great measure for project managers because they will know that regardless of how many people they assign to their project, the project would need at least that minimum number of days to be completed.
You have now successfully created the Network Diagram for your Project Plan. You now only need to finish Step 3 of Building the Project Plan before you completed!
Business Analysis Planning Technique #3: Gantt chart (Step 3 in Building a Project Plan)
This final step of creating the Gantt Chart or Project Schedule is where people often start. Starting with this step is not a great way to build a project plan because you have not considered the WBS step or Network Diagram step in any detail. It means you will be guessing a lot of the tasks, their dependencies and durations with trying to start directly within a calendar based planning tool. It is really valuable to first complete the WBS and then the Network Diagram before drafting the Schedule.
So what does this step really entail? In short, it is a combination of your WBS (Phase, Deliverable, Milestones and Tasks!) and Network diagram (Sequence and Dependencies) with the additional layer of a calendar and resources. You are essentially combining all your steps with a calendar where you are able to see specific calendar months and assign and share tasks among resources for your project. It shows you the “real” duration of the project in calendar months rather than work effort required.
Use a Gantt Chart (MS Project) to put this together electronically rather than the “Post It” notes.
In Conclusion
In a nutshell, if you are able to do these three project planning techniques and you understand the underlying purpose of each step, you are set to start participating or leading any project planning efforts! You will by know have a greater appreciation for the benefits of how these Project Planning Techniques and steps can assist you in your own Business Analysis Planning activities. Once you applied these three steps in practice once, you will never stop using it – promise! Give it a go!
Please share your opinions, views and ideas around Project Planning below.